
1. Introduction
If your Python project breaks because of dependency conflicts, virtual environments are the solution every developer must learn. One of the biggest challenges is to manage dependencies in Python development. As your application starts growing, Python developers install many external libraries like:
• Django
• Flask
• NumPy
• Pandas
• Requests etc.
If you install these libraries globally on a system, different projects may require different versions of the same dependency. This can lead to dependency conflicts, which can break applications.
Let us understand this with an example here. For example:
• Project A requires Django 3.2
• Project B requires Django 4.2
If you install both of these versions globally, then one of the projects could break or stop working when the library version is changed.
This problem is solved using virtual environments in Python.
A Python virtual environment (venv) creates an isolated workspace where dependencies are installed independently from the system Python installation.
In this guide, we start from the basics and gradually move towards real-world development workflows like Docker containers and CI/CD pipelines.
You will learn how to create a Python virtual environment step by step, manage dependencies using requirements.txt, and use it in real-world projects.
Quick Summary:
• Virtual environments isolate dependencies
• Prevent version conflicts
• Help in production deployments
• Used with pip, Docker and CI/CD
Prerequisites: Before learning Python Virtual Environments, you should have a basic understanding of how Python programs are written and executed inside .py files.
It is also helpful to know Variables in Python and Python Functions Basics, because real-world Python projects use them along with external libraries managed inside virtual environments.
2. Who Should Learn Python Virtual Environments
For developers, it is essential to have a good understanding of virtual environments. Here, I am going to share a list of developers who should learn this topic. The list is given below:
• A Python beginner who is learning project setup.
• A backend developer who is building APIs or web applications.
• A data scientist who works with multiple Python libraries.
• A DevOps engineer who deploys Python applications.
• A developer who is preparing for Python interviews.
In Python development, virtual environments are considered standard practice.
3. Create and Use a Virtual Environment
When working on Python projects, it is always a best practice to use a virtual environment so that each project can manage its own dependencies separately.
In the next few paragraphs, we will see how to create, activate, and use a virtual environment in a simple way.
Before you run the commands, open a terminal:
• Windows: Command Prompt or PowerShell
• macOS/Linux: Terminal (Bash or Zsh)
After that, please navigate to your project directory and type the following command:
Example:
Run the following command:
cd projectNow, follow the steps (as shown below) to create and use a Python virtual environment:
Step 1: Create the Environment
Create the environment using the command below:
python -m venv venvThis command creates a new virtual environment named venv inside your project folder.
Explanation:
Here is the detailed explanation of the above command:
• python: It runs the Python interpreter
• -m: It tells Python to run a module
• venv: It is a built-in Python module which is used to create virtual environments
• venv: It is the name of the environment folder
After running the above command, a new folder named venv appears in your project.
Example Structure: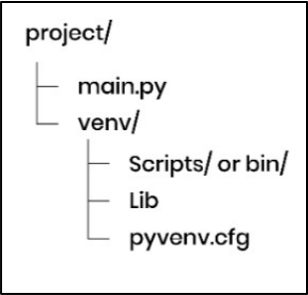
Explanation:
• venv: It is a virtual environment folder that stores everything related to the environment
• Scripts (Windows) or bin (macOS/Linux): It contains executables like Python and pip which are used by the environment
• Lib: It stores installed Python packages
• pyvenv.cfg: It is a configuration file that defines the environment settings
Step 2: Activate the Environment
Before using the environment, you must activate it.
• For Windows:
venv\Scripts\activate • macOS/Linux:
source venv/bin/activate When the environment gets activated, the terminal starts using Python and pip from the virtual environment (instead of system Python).
Once your environment is activated, then your terminal will show the environment name like:
(venv) C:\project>
The prefix (venv) confirms that the virtual environment is currently active.
Step 3: Install a Package
Once the virtual environment is activated, one can install the required libraries required for your project.
Python uses a package manager tool called pip to install third-party packages.
pip install requestsThis command is used to install the Requests library, which is used to send HTTP requests to APIs and websites.
The package will be installed inside the virtual environment as shown below: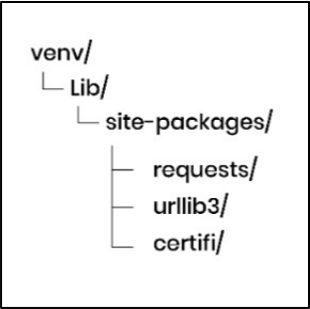
The site-packages directory stores all third-party Python libraries that are installed in the environment.
Please note that urllib3 and certify are installed automatically because they are required dependencies of the Requests library.
Step 4: Run Your Python Program
Once all required packages are installed, then the next step is to run your Python application.
python main.pyThis command is used to run the Python script main.py, and now the program will automatically use the packages installed inside the environment.
Step 5: How to Deactivate a Virtual Environment
Once you have finished your work, then you can deactivate the environment using the following command:
deactivateAfter running this command, your terminal is returned to the system Python environment.
Note: The project and virtual environment still exist, but they are not active now.
4. What is a Python Virtual Environment (venv)?
It is an isolated directory that allows a project to have its own Python dependencies without affecting other projects on the same system.
Technically, it contains the following items:
• A Python interpreter which is created based on system Python
• A separate location for installed third-party libraries (inside the site-packages directory)
• Scripts which are used to activate and manage the environment
Due to this isolation, each project can maintain its own dependency versions.
Let us understand it with a simple example as shown below:
Example: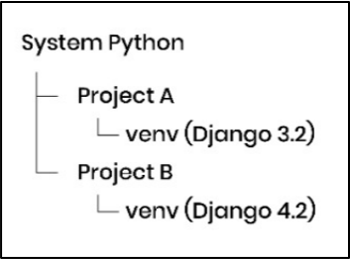
Explanation:
In this example, the system has a Python installation (say Python 3.11) which is used to create virtual environments for different projects.
After this, we have created two projects: Project A and Project B, which are created on the same machine, and we have used the same Python (Python 3.11). Each project has its own virtual environment which allows them to install different versions of libraries.
Django 3.2 is installed for Project A and Django 4.2 is installed for Project B.
Since each project has its own virtual environment, that is why two different versions don’t conflict with each other.
Note: Django is a famous Python web framework which is used to build websites and web applications in a secure way.
5. Virtual Environment Architecture
When you create a virtual environment, then Python builds a self-contained directory structure that basically includes its own Python runtime, package manager (pip), and installed libraries.
This structure looks good and also allows each project to maintain its own dependencies, and also it does not affect other Python projects on the same system.
This diagram shows how Python organizes different components inside a virtual environment.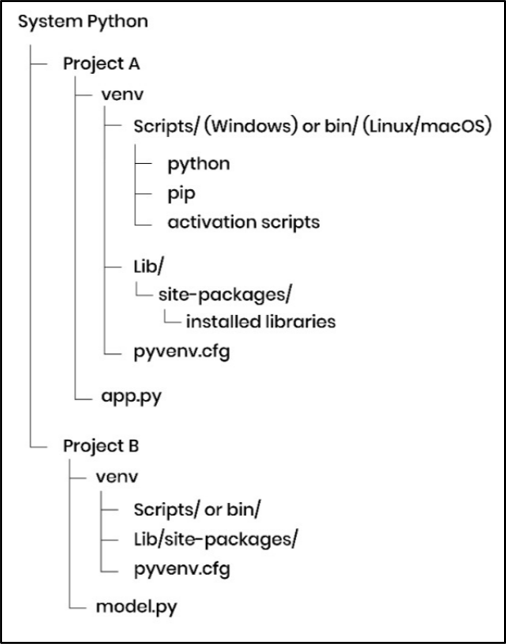
Explanation:
a) Scripts/ or bin directory:
It contains the executable files which are used by the virtual environment. Few examples are:
• Python interpreter
• pip package manager
• activation scripts
Please note that on a Windows machine, this directory is called Scripts, and on Linux and macOS, it is called bin.
b) Lib/site-packages directory:
It stores all third-party libraries which are installed using pip install.
Due to this directory inside the virtual environment, each project maintains its own dependency versions separately.
The following example would make it more clear: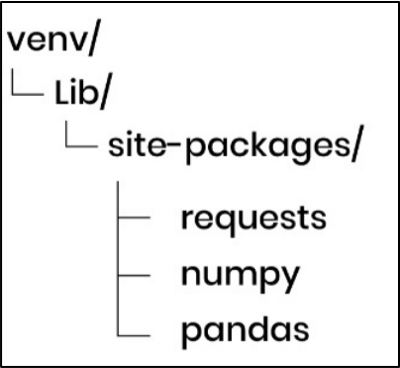
c) pyvenv.cfg:
It is used to store metadata about the virtual environment. Let us understand it with an example:
Example of pyvenv.cfg:
home = C:\Python311
include-system-site-packages = false
version = 3.11.5
Explanation:
In this example, home shows the location of the base Python installation, which is used to create the virtual environment.
• include-system-site-packages: It determines whether the virtual environment can access packages installed in the system Python. Here, false means it only uses packages installed inside the virtual environment.
• version: It shows the Python version which is used to create the virtual environment.
Please note that every project has its own venv directory that contains its own interpreter and libraries. Hence, a developer can work on multiple Python projects safely.
If you install or upgrade a package in one environment, it would not affect other projects on the same system.
6. Useful venv Command-Line Options
When you create a virtual environment using venv, then you can also add extra options to control how the environment behaves.
As discussed earlier, below is a command to create environment:
python -m venv venv
In addition to this, you can also add extra options that modify the environment behavior.
Let us now discuss each one by one:
a) --system-site-packages:
This option allows the virtual environment to access packages that are already installed in the global Python environment.
python -m venv --system-site-packages venv
Once you use this option, the environment can also access system-wide libraries.
Most of the time, developers keep this option disabled so that full dependency isolation can be maintained.
b) --prompt:
This option is used to change the name displayed in the terminal when the virtual environment is activated.
python -m venv --prompt myproject venv
By default, environment name (venv) is shown on the terminal.
By using this option, developers can customize the prompt name, and this option is especially helpful when you work with multiple environments.
c) --upgrade:
This option is used to upgrade an existing virtual environment to use the current Python interpreter which is installed on the system.
python -m venv --upgrade venv
This option is used by developers when they want an existing virtual environment to reflect a newer Python version (which is upgraded on the system).
d) --clear:
This option is used to remove the contents of an existing virtual environment directory before you recreate it.
python -m venv --clear venv
You can use this option when your environment becomes corrupted and, as a developer, you want to recreate a clean environment (without manually deleting the folder).
Please note that this option removes the content of the current virtual environment directory (venv) and also creates a new virtual environment again:
• It recreates the Python interpreter
• It recreates the activation scripts
• It also recreates the site-packages directory
So, as a developer, you don’t need to run the create command again.
So, your project files remain safe.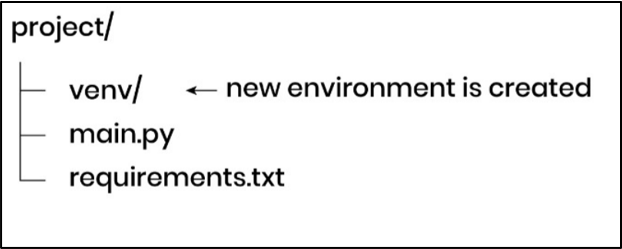
Please note that with the --clear option, the environment will be empty, so you can reinstall dependencies using the following command:
pip install -r requirements.txt7. Why Virtual Environments Are Important
Virtual environments play a very important role in Python development. It helps developers to manage dependencies in a clean and reliable way.
Here are the main benefits of virtual environments:
a) Dependency Isolation:
It allows you to install and use the exact versions of libraries your project requires.
It ensures dependency isolation, which means one project does not interfere with another, even if both projects depend on different versions of the same package.
b) Repeatable Builds:
It is very easy to recreate the same setup on any machine using a virtual environment.
With the help of a file requirements.txt, any developer can install the same versions of all packages, and it also ensures consistency across development, testing, and production environments.
c) Safe Upgrades:
As a developer, you can test upgrades without affecting existing applications.
For example, suppose there is a need to upgrade packages directly in a live project, then first your team can create a separate environment and apply the upgrade, and finally check if everything works as expected.
Example Scenario:
Suppose there is a web application that currently uses Django 3.2.
But before upgrading to Django 4.2, you can do the following activities:
1. Create a new virtual environment
2. Install version Django 4.2
3. Finally, you can run it and test your application
If any issue occurs, then your original environment would remain safe (unchanged).
This approach ensures safe and smooth deployments.
8. Deactivating and Deleting a Virtual Environment
Let us discuss the difference between these two clearly, as most developers get confused between them.
a) Deactivating:
Deactivation means you are stopping the use of the virtual environment temporarily, and you are returning back to the system Python.
Use the following command:
deactivate
Please note that after deactivation, your environment remains intact and you can activate it anytime.
b) Deleting:
Deleting means you are permanently removing the virtual environment from the system.
Use the following command:
rm -rf venvBy using this, the environment and all installed packages would be removed and it must be recreated (if needed).
9. Installing Packages in Virtual Environment
Once you have activated the virtual environment, then you can install packages using pip. All installed packages will be stored inside the environment, and it won’t affect the system Python installation.
a) Install a Package:
This command is used to install a new package in the virtual environment.
Syntax:
pip install <package-name>
Command:
pip install requests
It installs the requests package inside the virtual environment.
Please note that this package would be available only within this environment, and it won’t affect system Python.
b) List Installed Packages:
If you want to see all the installed packages in your virtual environment, then run the following command:
pip listIt would display all packages which are installed in the virtual environment.
This command is often used (by developers) to verify which dependencies are available in your project.
c) show package details:
This command is used to view detailed information about a specific package.
Syntax:
pip show <package-name>
Command:
pip show requestsThis command shows the detailed information about a package requests like version, location and dependencies of the package.
Normally, it is used for debugging and verifying installation.
d) Uninstall a package:
This command is used to remove a package from the virtual environment.
Syntax:
pip uninstall <package-name>
Command:
pip uninstall requestsIt removes the specified package from the environment. It also helps to keep your dependencies clean and up to date.
10. Managing Dependencies with requirements.txt
A file requirements.txt is used that stores all project-related dependencies so that they can be easily shared and recreated.
a) Create Dependency File:
This command is used to save all installed packages into a file.
Syntax:
pip freeze > requirements.txt
Command:
pip freeze > requirements.txtThis would create a file 'requirements.txt' that contains all installed packages with their versions. This also helps to ensure that the same environment can be recreated on another system.
Example of requirements.txt:
This file contains all dependencies along with their exact versions as shown below:
requests == 2.31.0
urllib3 == 2.0.5
Above is a sample of 'requirements.txt' file and as you can see, it contains 2 packages like requests and urllib3 with their version numbers.
b) Install Dependencies from file:
This command is used to install all packages mentioned in the file.
Syntax:
pip install -r requirements.txt
Command:
pip install -r requirements.txt
It would install all dependencies (mentioned in file) with the specified versions. This command normally helps developers to set up the same environment (in a quick way) across different machines.
11. Python Virtual Environment Example Project
In this section, we will see how virtual environments are used in a real production-style backend project. Hopefully, you would be able to get benefit from my IT experience.
Project Structure: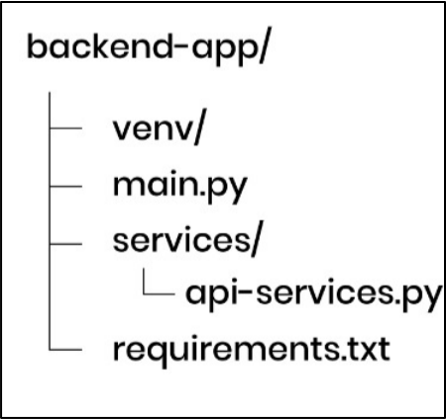
Let us now discuss about each file:
a) venv/:
It contains the isolated Python environment with all installed dependencies.
b) main.py:
This is the entry point of the application where the program starts the execution.
c) services/api-service.py:
This file contains the main business logic of the application such as API calls or external service integrations.
d) requirements.txt:
This file stores all the project dependencies so that later a new environment can be recreated (based on need).
Now, it is time to see how these different files in this project work together to build a simple application.
Example Code:
main.py:
This file acts as an entry point of the application where execution of the program gets started. In this file, code is written to control the program flow and business logic is called from other modules.
from services.api_service import get_github_status

status = get_github_status()
print(status)Explanation:
In this example, first we import a function from the service layer and then execute it. The function call fetches data (like API status) and returns a result. Finally, the result is printed to the console.
In your projects, you can also use this file to handle routing, orchestration or app startup.
services/api-service.py:
This file normally contains the business logic of your application which is separated from the main program.
In this file, we write the business logic to keep the code modular, reusable and easier to maintain.
import requests

def get_github_status():
  response = requests.get("https://api.github.com")
return response.status_codeExplanation:
In this, we have defined a function that is used to send a request to the GitHub API using the requests library. It receives a response and extracts the status code.
Finally, this value is returned to the main program.
In this way, logic is separated into a service file which helps to organize code in production systems.
How This Works in a Real Project:
Let me share here few steps: -
1. First, developer creates a virtual environment inside the project.
2. Then, required dependencies (like requests) are installed.
3. Modular code is written by separating logic into different files.
4. Dependencies are saved in requirements.txt file.
5. Project is shared with other developers.
Production Workflow:
Till now, we have understood the overall project structure and code. Now, let’s see how this setup is used in a real development environment when multiple developers start working on the same project.
In team-based workflows, a standard process is followed by developers and this process ensures that the application should run consistently across multiple machines.
Steps:
1. The project repository is cloned by another developer.
2. A virtual environment is created.
3. Next, all dependencies are installed using the following command:
pip install -r requirements.txt
4. Finally, application is run using following command:
python main.py
5. Next, you save all your code changes and send them to a shared project (GitHub) so that other developers can see and use the updated code. In this way, everyone in the developer’s team stays in sync.
6. In last, once your code is committed, then CI/CD pipelines create a fresh environment and install all the dependencies using requirements.txt file and run the tests to see if new changes are working correctly or not.
If everything is passed, then your code is allowed to move to production. Otherwise, code is stopped before going to production.
Explanation:
Here, the "requirements.txt" file ensures that all required dependencies are installed with the correct versions. This ensures consistency between multiple environments like development, testing and production environments, a virtual environment helps to avoid conflicts with other projects.
This workflow is very important and is used by professional teams, as it also ensures reliable and reproducible application setup.
Please note that CI/CD pipelines are always done in:
• CI environment (Continuous Integration server)
• Staging / testing environment
This approach ensures that only verified and stable code is pushed to production.
12. Checking Which Python Interpreter You Are Using:
Sometimes, it is important to know the version of Python interpreter that you are using, especially when you work with virtual environments.
Let’s discuss this for different OS (macOS, Linux, Windows).
a) Check Interpreter (macOS / Linux):
Below command is used to show the path of the Python interpreter: -
which pythonIt would display the Python interpreter path which is currently in use. If your virtual environment is active, then the path should point inside the venv folder.
b) Check Interpreter (Windows):
If you are working with Windows, then you should use the following command: -
where pythonIt shows the location of the Python executable being used.
When the environment is active, then it would also point inside the venv folder instead of the system Python.
It gives you (as a developer) confirmation that your project is using the correct environment.
It also helps you to avoid accidentally using the system Python instead of the virtual environment.
13. Troubleshooting Common Virtual Environment Issues:
In real projects, it is a straightforward process to set up a virtual environment, but sometimes few developers face small issues.
Based on my experience, these problems are common across different operating systems.
If you understand these issues and their solutions, then it would help you to ensure that your environment works correctly and would also reduce your debugging time as well.
Following is a list of the most commonly encountered problems and their solutions:
a) pip installs globally:
This issue occurs when a developer installs the packages outside the virtual environment (instead of inside it).
Reason:
The virtual environment was not activated before running the install command.
Solution:
You should always activate the virtual environment first and then install the needed package(s), which would ensure that the package is installed in the correct location.
b) python vs python3 command:
Sometimes, the command python doesn’t point to the correct Python version. As a result, the virtual environment is created (by developers) using the wrong Python interpreter.
Mostly, I have seen in following scenarios where: -
• multiple Python versions are installed
• python is linked to an older version (like Python 2 or Python 3)
• python3 points to the newer version
Solution:
You should always use the command that points to the correct Python version.
For example:
python3 -m venv venvIn above command, we are using python3 interpreter to create a virtual environment.
My advice is to always check Python version to ensure the correct interpreter and then create a virtual environment.
If python --version command displays the correct version, then use python. Otherwise,
c) Activation script not found:
Sometimes, your virtual environment is not activated and activation command fails and sometimes, you see a "script not found" type of error.
Based on my experience, this issue occurs mainly due to three reasons:-
• your activation command doesn’t match the system or terminal
• the given path to the virtual environment is wrong
• the environment has not been created properly
Common command (which may fail in some cases):
venv\Scripts\activate
This command may not work in all environments.
Explanation:
Virtual environments provide different activation scripts depending on system and environment. If you would use a wrong command, then system won’t be able to find the correct script and it would fail to activate the environment.
Solution:
You should always check the activation script inside the virtual environment folder and use the command that matches your terminal.
In short, once environment is created, then go inside the venv folder:
venv/
• Scripts (on Windows)
• bin (on macOS / Linux)
Inside this folder, you will find files like
i) On Windows (Scripts)
• activate
• Activate.ps1
• activate.bat
ii) On macOS / Linux (bin)
• activate
Finally, you should always run the command that matches your file name.
Let me explain with a short example here: -
Example:
If you see following file inside Scripts: -
Activate.ps1
then you should use the following command to activate the environment: -
.\venv\Scripts\Activate.ps1
On the other side, if you see following as: -
activate
then, you should use following one: -
source venv/bin/activate
14. virtualenv vs venv vs Conda
Today, there are multiple tools available in market to create virtual environments like venv, virtualenv and conda.
All of them differ in terms of features, complexity and use cases.
It is very important for you to understand these differences, as it will help you to choose the right tool for your project.
Let me write down few quick and short definitions of each tool here, before showing comparison table, because it would help you to choose the right tool for your project.
Quick Definitions:
• venv: It is a built-in Python module which is used to create lightweight virtual environments.
• virtualenv: It is an external tool (similar to venv) and it is mainly used for older Python versions.
• Conda: It is a package and environment management system which is widely used in data science and machine learning.
Now, you have got a good understanding of each of these tools (definition-wise), so now it is a good time to understand comparison b/w these three.
Comparison Table:
|
Feature |
venv |
virtualenv |
Conda |
|
Built into Python |
Yes |
No |
No |
|
Package Manager |
pip |
pip |
conda (it also supports pip) |
|
Best for |
web apps, scripts |
legacy support |
Data Science, ML |
|
Handles system pkgs |
No |
No |
Yes |
|
Environment size |
Lightweight |
Lightweight |
Heavier |
|
Typical use |
Django, Flask projects |
Older Python setups |
ML, Jupyter, scientific work |
My advice would be to use venv for general Python development and you should use Conda only when you are working with complex scientific or machine learning environments.
15. Using Virtual Environments with VS Code
In real world development, you (as a developer) often use virtual environments inside the code editors like VS Code. It ensures that correct Python interpreter and dependencies are used for a project.
Steps to select Virtual Environment:
The below diagram shows how to select a virtual environment in VS Code step by step: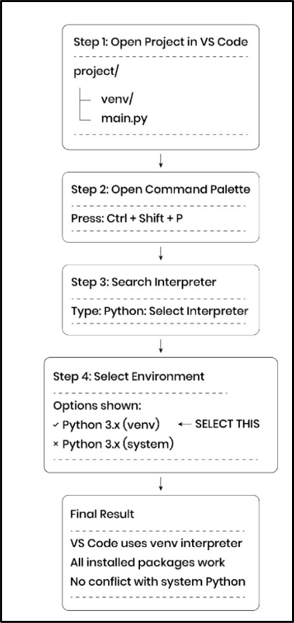
Step 1: First, open your project in VS Code
Your folder should look like this: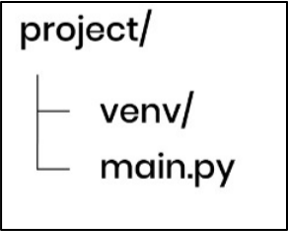
Step 2: Open Command Palette
Press Ctrl + Shift + P
This would open a search bar at the top.
Step 3: Search this
Type the following inside search bar: -
Python: Select Interpreter
After that, click it
Step 4: Select your environment
Then, you will be able to see following options like: -
Python 3.x (venv)
Python 3.x (system)
You should select the one that has (venv)
After that, VS Code would start using your virtual environment and all installed packages (like requests etc.) will work.
There won’t be any conflict with system Python.
16. Using Virtual Environments in Production (Docker & CI/CD):
Till now, you have learnt how virtual environments work in development, it is also very important to understand how similar concepts are used in real production systems.
In production, you don’t need to manually create virtual environments on every server. As a developer, you can use tools like Docker and CI/CD pipelines to automate environment setup and ensure consistency.
In short,
a) In development environment: -
• Developers create a virtual environment (venv)
• Dependencies are installed using pip
• Run the application
b) But, in production environment: -
• Docker creates an isolated environment automatically
• Dependencies are installed using requirements.txt
• Your application is run on a consistent setup across all systems
To understand how this works in practice, let me show a simple Dockerfile example here:-
FROM python:3.12
WORKDIR /app
COPY requirements.txt .
RUN pip install -r requirements.txt
COPY .
CMD ["python", "main.py"]Example:
In this example, first you use a base image that already has Python 3.12 installed.
Then you set up a working directory where your application code will run (/app).
After that, you copy the requirements.txt file and install all required dependencies using command:
RUN pip install -r requirements.txt
Next, your complete project code is copied into /app directory inside Docker. Finally, you run your application and it is same as:
python main.py
and with these steps, Docker also creates a Docker image as well.
How it works in production:
Following process is followed in production environment, you don’t need to create environments manually: -
a) Firstly, your application is packaged as a Docker image
b) Then, the Docker image is stored in a container registry (cloud)
c) After that, Docker image is downloaded by production servers
d) Finally, application is started using Docker
Role of CI/CD Pipelines:
Once the application is packaged and deployed using Docker tool, let us now understand how this entire process is automated in real world applications using CI/CD pipelines.
CI/CD pipelines automate the process of building, testing and deploying applications.
Based on my experience, let me explain it in 4 simple steps: -
1. When you update your code, you commit your code which means you save and upload your code to the repository.
2. CI runs automatically and it does follow tasks: -
• creates fresh environment
• installs dependencies with following: -
pip install -r requirements.txt
• runs tests
3. If everything is correct, then CD deploys your application to server
4. If something is failed, then deployment is stopped
In this way, CI/CD pipelines automate the process of building, testing, and deploying applications and this overall process ensures consistency and reliable software delivery.
17. Best Practices for Python Virtual Environments
It is very important to use virtual environments in a correct way, if you want to build stable and production-ready Python applications. Below I am writing down few best practices based on my experience.
a) Create One Environment per Project: -
You should always create a separate virtual environment for each project. It ensures that dependencies don’t conflict across different projects and it also keeps your setup clean and isolated.
b) Do Not Commit venv to Git: -
The virtual environment folder contains system-specific files and it can be easily recreated.
As a developer, you should never commit venv to Git and always share your dependencies using requirements.txt.
c) Maintain a requirements.txt file: -
You should always keep a requirements.txt file updated with exact package versions. This will allow anyone to recreate the same environment using below written command: -
pip install -r requirements.txt
d) Use Consistent Python Versions: -
One should ensure that same Python version is used across different environments - development, testing and production. Because if you would use different Python versions, then it can cause compatibility issues and unexpected errors.
e) Install Only Required Dependencies: -
You should avoid installing unnecessary packages inside your environment. If you would keep dependencies minimal, then it would improve performance, reduce security risks and also makes your project easier to manage.
18. Interview Questions on Python Virtual Environments
a) How do you create a virtual environment in Python?
Ans: You can create a virtual environment using the built-in venv module: -
Example: -
python -m venv venv
b) What problems does a virtual environment solve?
Ans: It isolates dependencies for each project. Also, it prevents version conflicts when multiple projects require different versions of the same package.
c) How can you recreate dependencies in a project?
Ans: It is very easy and one can use the requirements.txt file.
Command is given below: -
pip install -r requirements.txt
d) Why should you not commit venv to Git?
Ans: - The venv folder is system specific, large in size and can be recreated easily. Instead, you should share dependencies using requirements.txt.
e) Can you use multiple virtual environments on the same system?
Ans: - Yes, you can create multiple virtual environments for different projects on the same system. Please note that each environment works independently without affecting other environments.
19. Frequently Asked Questions
a) How to create and use a Python virtual environment step by step for beginners?
Ans: First, to create a virtual environment, run the following command inside your project folder: -
python -m venv venv
After that, activate the environment and you should also install required packages using pip. This ensures that your project runs in an isolated environment without any conflict.
b) What is the difference b/w requirements.txt and virtual environment in Python?
Ans: A virtual environment stores installed packages locally for a project. On the other side, the requirements.txt file contains a list of packages and versions, which helps to recreate the same environment anywhere.
c) How to share a Python project with all dependencies to another developer or server?
Ans: You should always share your source code along with the requirements.txt file. The other developer or server can recreate the environment using following command to install all dependencies: -
pip install -r requirements.txt
d) Why is virtual environment important for production deployment in Python applications?
Ans: In production, your application runs on multiple different systems. Virtual environments ensure that same dependency versions are used, because it will reduce errors and would make deployment more reliable and stable.
20. Summary
Python virtual environment is one of the most important tools for building reliable and scalable Python applications. If you are working on a real project, then it becomes very important to manage dependencies. It allows you to isolate your project, you can also control library versions and also avoid unexpected conflicts that can break your application.
By using a virtual environment along with a properly maintained requirements.txt file, you can easily recreate the same setup across different environments - development, testing and production systems.
This provides many benefits like consistency, reduces deployment failures and also improves overall stability of your application.
21. Key Takeaways
Here are the main important points:
• You should always create one virtual environment per project.
• You should always use requirements.txt file to manage dependencies.
• You should always avoid dependency conflicts by isolating environments.
• You should ensure consistent behavior across development and production.
• You should always follow industry best practices for scalable applications.
Learn more in our “Python Requests Tutorial" chapter.